Step by step woodworking a project about attached carport plans. Building a carport attached to the house is a straight forward project for any homeowner with basic woodworking skills. In this article we show you how to secure the posts and the ledger into place, as well as how to build the structure of the roof. Chose the lumber with great care, making sure it is perfectly straight and doesn’t have any kind of visible flaws. Ask a friend to assist you, when installing the ledger, the support beams or the rafters into place, as a person has to hold them, while the other one drives the screws in.
There are many carport design, shapes and sizes, therefore you should thoroughly assess your option before taking the final decision. A free standing carport is a more complex and expensive project, therefore building a carport attached to your house is a great solution to your needs, especially if you have enough space in the yard. Lay out the pergola in a professional manner, using batter boards and string, making sure the corners are right angled.
Projects made from these plans
Carport attached to a house components

Building a carport attached to the house is a straight-forward project, as you have to fit several posts and anchor a ledger to your house. Afterwards, you have to install several rafters, attach the roofing sheets and fit the asphalt shingles.
Top Tip: If you want to get the job done in a professional manner and build an unique attached carport, you could attach lattice panels to the sides. In addition, cover the ends of the rafters by placing wooden trims.
Attached carport plans

In order to secure the posts into position, you have several options. On one hand, you can dig 2-3′ deep holes, compact 4” of gravel and fit the posts into concrete. On the other hand, you could get the job done by pouring footings, using tube forms and a metal post anchor.
Top Tip: If you have to build the carport on a concrete slab, you should anchor the metal hardware, using the appropriate screws.

Let the concrete to dry out properly, before fitting the posts into the metal anchors. Cut the wooden posts at the right size and fit them into place. Use a spirit level to plumb the posts and lock them into position with two braces.
Top Tip: Drill several pilot holes and drive in the lag screws, to secure the posts tightly. Use string to align the posts one with another, before inserting the 3” lag screws.

Next, you have to cut the support beams at the right size and install them into place with 7” carriage bolts. Pre-drill the lumber, in order to avoid the wood from splitting. Ask a friend to assist you, when installing the 2×6 beams.
Top Tip: Align the beams at both ends and level them properly, using a spirit level. Lock the beams into place with several C-clamps, before driving in the pilot holes.
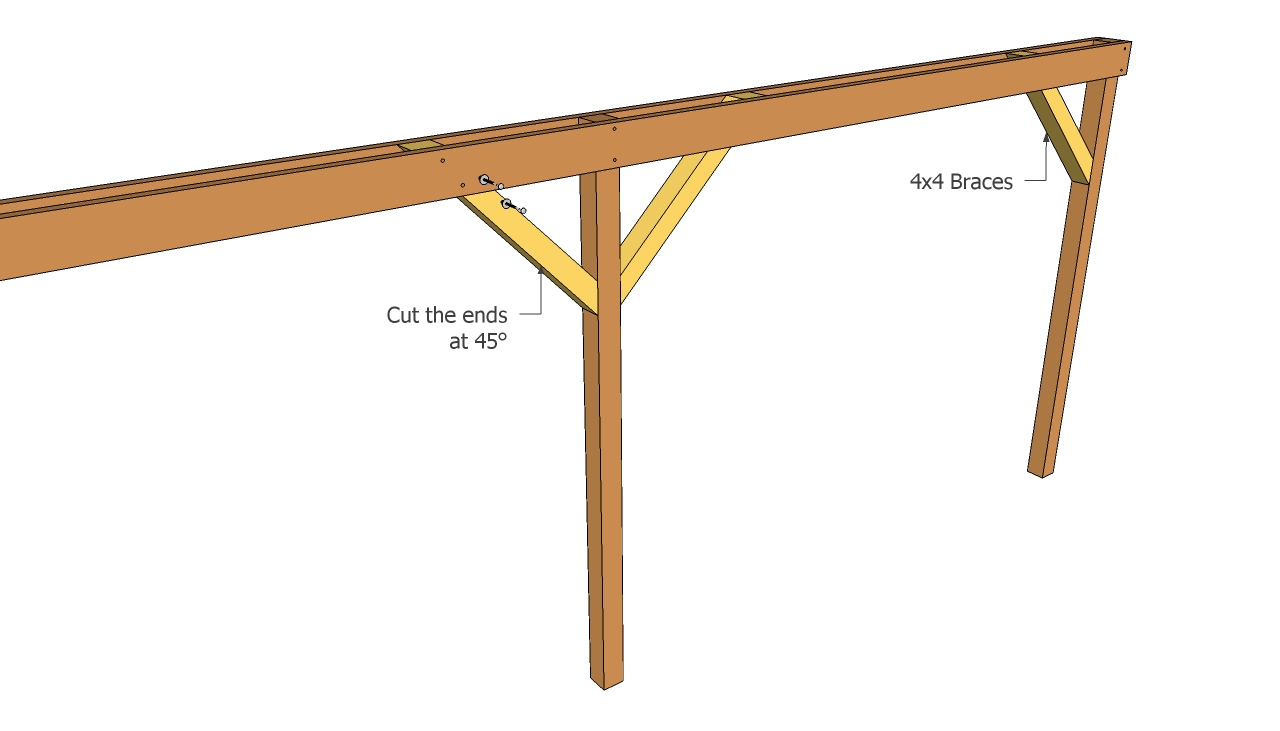
If you live in a windy area, you should increase the rigidity of the structure, by installing 4×4 braces, as in the plans. Cut the ends of the braces at 45° and smooth the edges wit a sand block and 120-grit sandpaper.
Top Tip: Work with great care attention and good judgement, if you want to obtain a professional result. Drill pilot holes trough the components and drive in the wood screws.
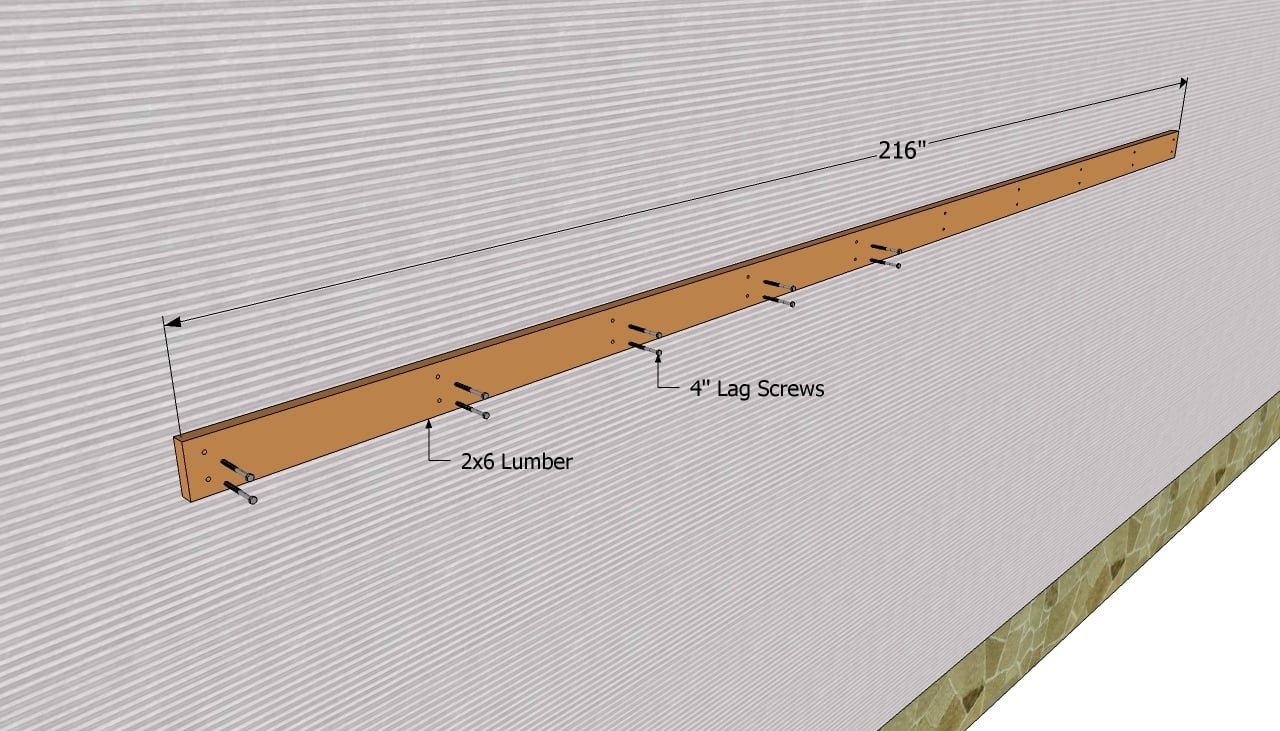
After you have built one side of the carport, you should install the 2×6 ledger to the house and secure it with lag screws. The connection between the ledger and the house is essential for this project. Locate the framing of the house and drive in bolts that reach into or trough the studs.
Check the ledger for level and for flatness against the wall. Tie a string at both hands of the ledger and see if the gap is uniform all over its length.
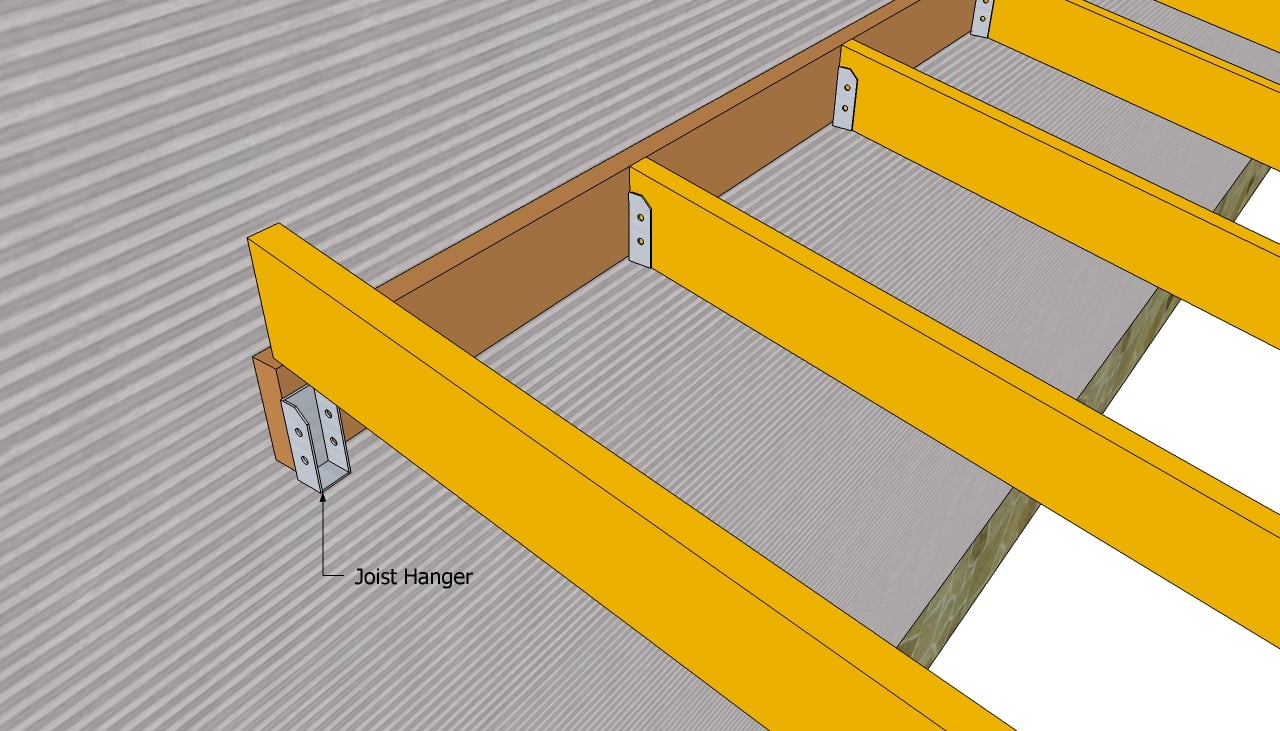
Afterwards, you should fit the 2×6 rafters into place (you could use 2×4 beams, as well). In order to lock the rafters properly, we strongly recommend you to use metal hangers. Nevertheless, don’t forget to align the rafters at both ends before locking them into place with wood screws.
Top Tip: The slope of the roof should be at least 15°, in order to drain the water properly. Place the rafters every 24” OC, or even closer (16”), in order to increase the rigidity of the whole structure.
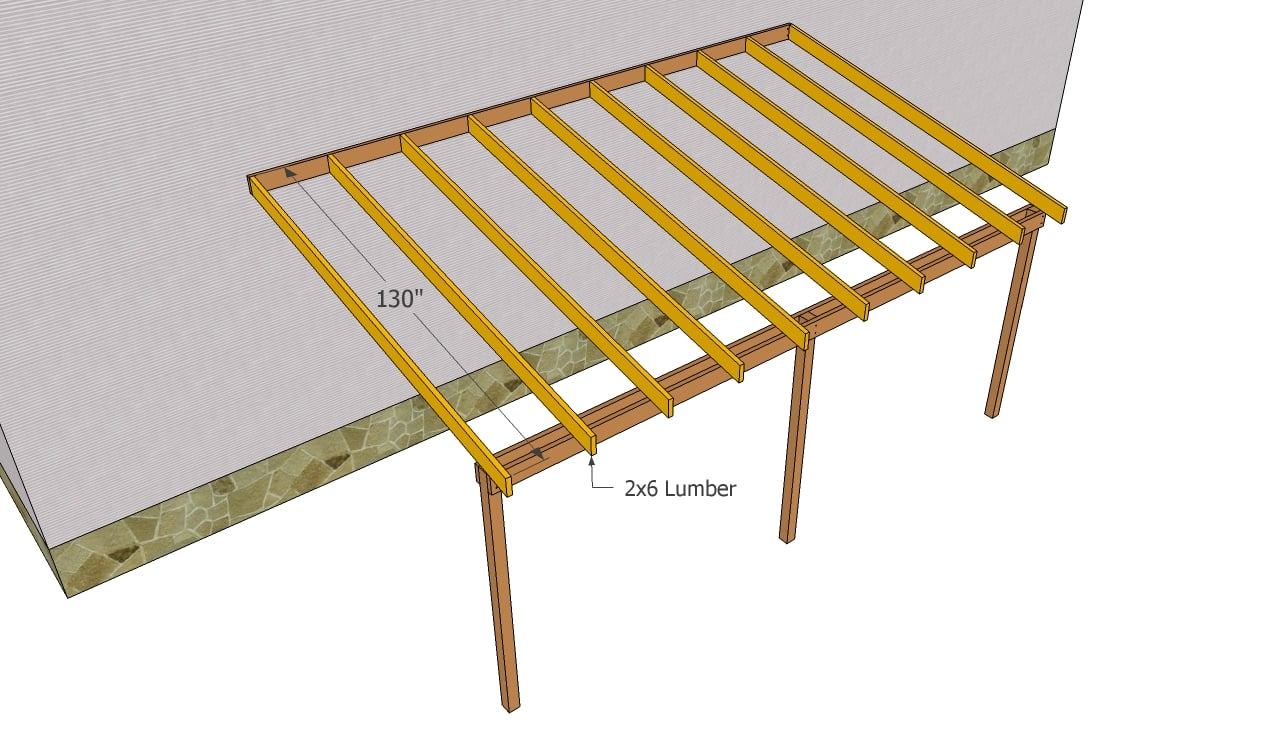
As we have already said, an attached carport is a straight-forward project, if you use the right plans and carpentry techniques. Continue the job in the same manner described above, until you install the rest of the rafters.
In order to provide added strength, nail a twist fastener at the intersection of the rafters with the support beams. You could also get the job done by toe-nailing the rafters to the 2×6 beams.
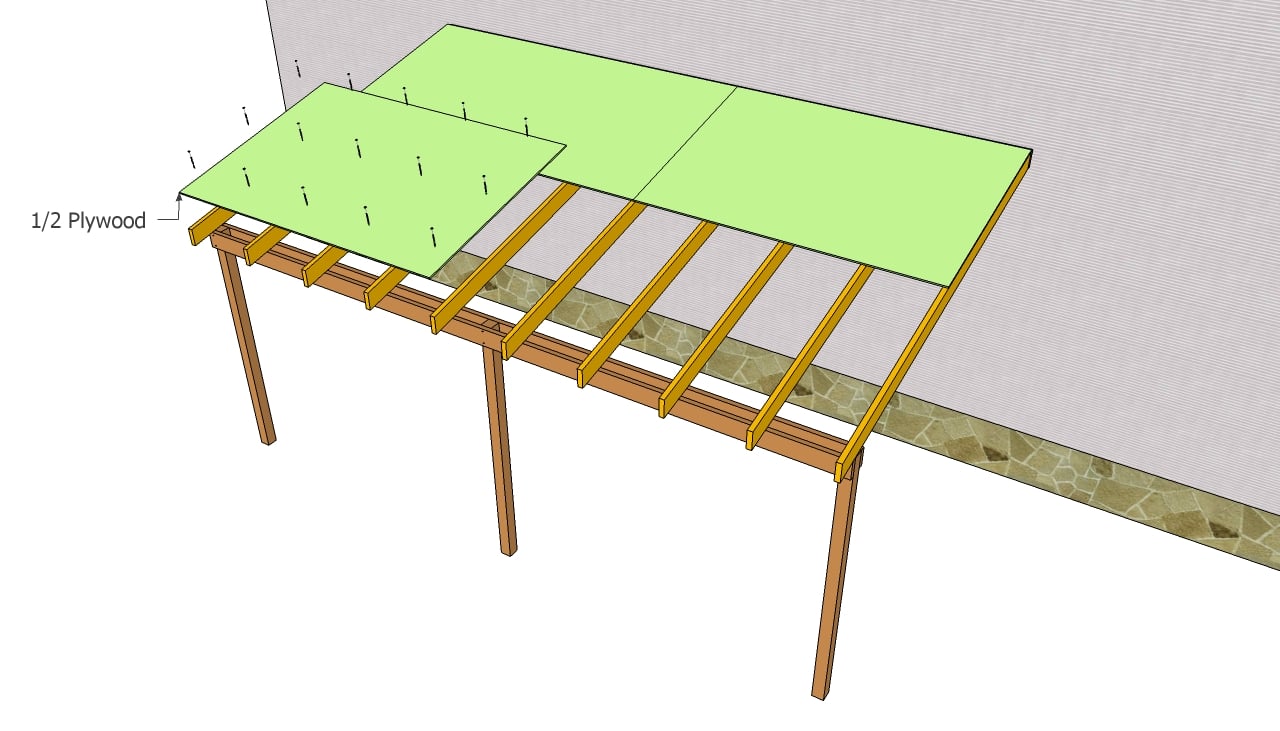
Afterwards, attach the 3/4” tongue and groove plywood to the rafters, as in the image. Fit the sheets into place and secure them with decking screws. Work with great care and attention, as the roofing sheets should flash the rafters.
Top Tip: Install the drip caps properly, as well as the roofing felt. The bottom drip caps should be installed under the roofing felt, while the side drips caps should be placed over the tar paper.

Next, cover the whole surface of the roof with tar paper, starting with the bottom of the roof, and lock it into place with staples. Afterwards, install the asphalt shingles, from the bottom to the top. Secure the shingle tabs with 1/2” nails and chalk lines, to guide you when installing the rows.
Top Tip: Pay attention to the joint between the roof and the wall, as it is essential to get the job done in a professional manner.
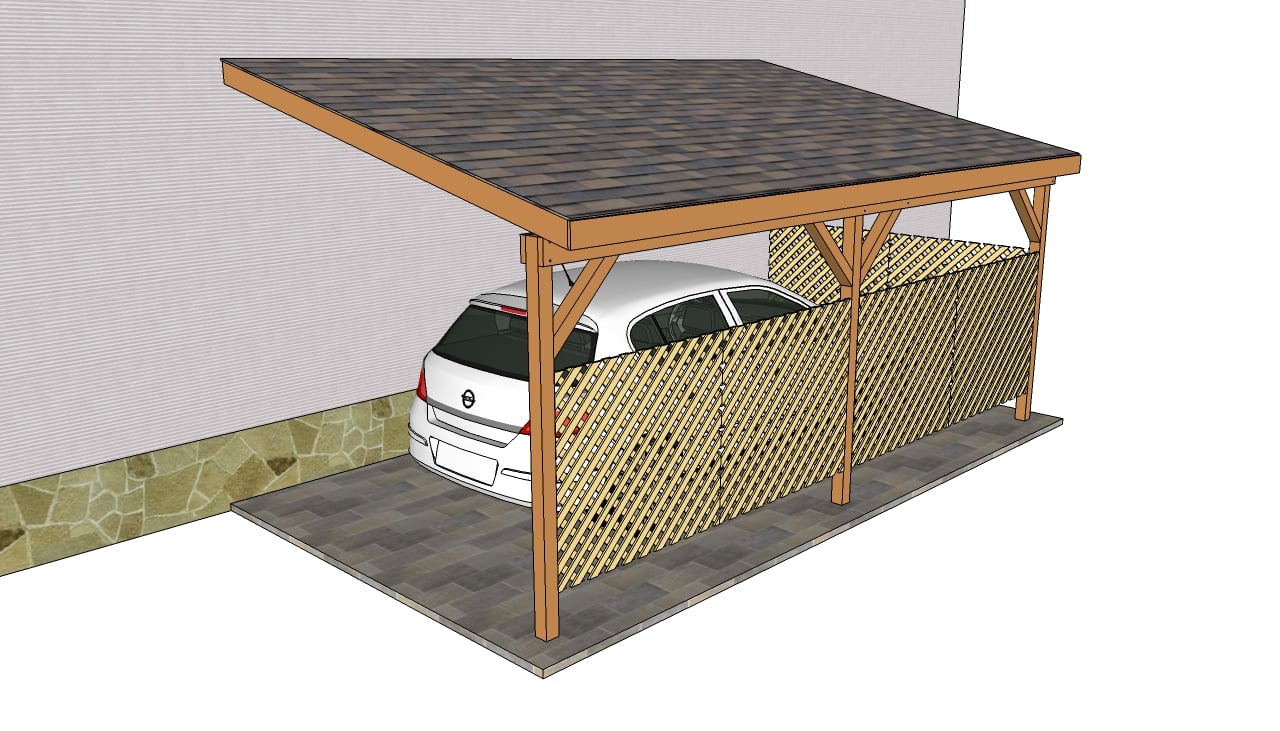
Last but not least, you have to attach lattice panels to the sides of the carport, is you want to protect the car better, and to enhance the look of your backyard. Fill the gaps with wood putty and let the compound dry out for several hours, before sanding the surface with medium-grit sandpaper.
Top Tip: Clean the surface with a cloth and apply several coats of wood stain, to protect the wood from water damage and decay.
This woodworking project is about attached carport plans. If you want to see more outdoor plans, we recommend you to check out the rest of our step by step projects. SHARE our projects and follow us on the social networks to help us keep adding free woodworking plans. LIKE us on Facebook to be the first that gets our latest updates and submit pictures with your DIY projects.
Original article and pictures take http://myoutdoorplans.com/carport/attached-carport-plans/ site
Комментариев нет:
Отправить комментарий