Last week I posted a very popular article on making compost and the feedback was incredible. I had a few people ask about building a good sturdy compost bin. I originally was going to send them a few images of the compost bin that I currently use, it’s simply three pallets bolted together. Right before I pressed the send button on my email, I kinda realized what I currently have is really not that great. I set out to find a new design that I can build myself and share with everyone.
My old compost bin.
After doing some research, I found some plans online from the University of Missouri. While reading through them, my creative side took over and I came up with a few versions of my own. I also booted up my computer and proceeded to create the design in AutoCAD. The following is what I have created with the existing plans.
Materials
(4) 12ft pc of pressure treated 2 x 4’s
(2) 10ft pc of pressure treated 2 x 4’s
(1) 10-foot length of construction-grade 2 x 4 lumber
(1) 16-foot length of 2 x 6 lumber
(6) 8-foot lengths of 1 x 6 lumber
(1) 22-foot length of 36-inch-wide 1/2-inch hardware cloth
16d galvanized nails (2 pounds)
Poultry wire staples (250)
(12) 1/2-inch carriage bolts, 4 inches long, with washers and nuts
One quart wood preservative or stain
Compost Bin Plans
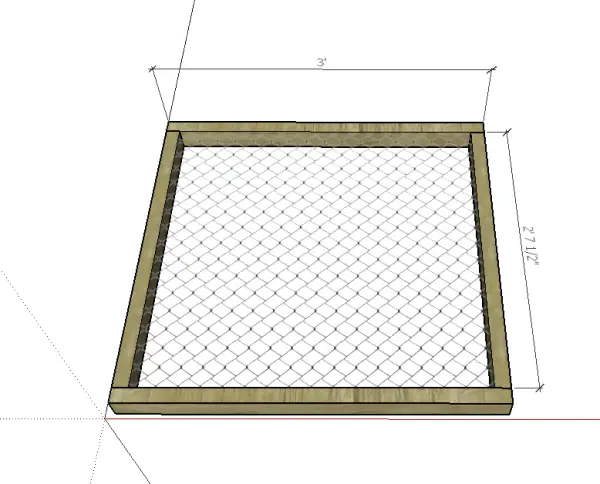
Cut two 31-1/2-inch and two 36-inch pieces from a 12-foot length of pressure-treated 2 x 4 lumber. Butt-joint and nail the four pieces into a 35-inch x 36-inch “square”. Repeat, building three more frames with the remaining 12-foot lengths of 2 x 4 lumber.
Cut four 37-inch lengths of hardware cloth. Fold back the edges of the wire 1 inch. Stretch the pieces of hardware cloth across each frame. Make sure the corners of each frame are square and then staple the screen tightly into place every 4 inches around the edge. The wood and wire frames will be dividers in your composter.
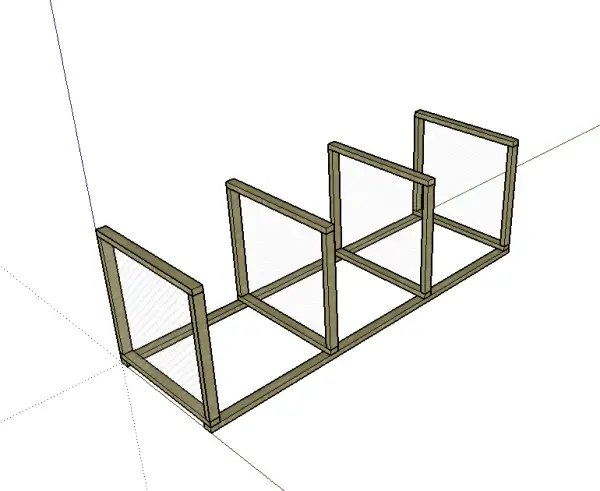
Set two dividers on end, 9 feet apart and parallel to each other. Position the other two dividers so that they are parallel to and evenly spaced between the end dividers. Place the 36-inch edges on the ground. Measure the position of the centers of the two inside dividers along each 9-foot edge.
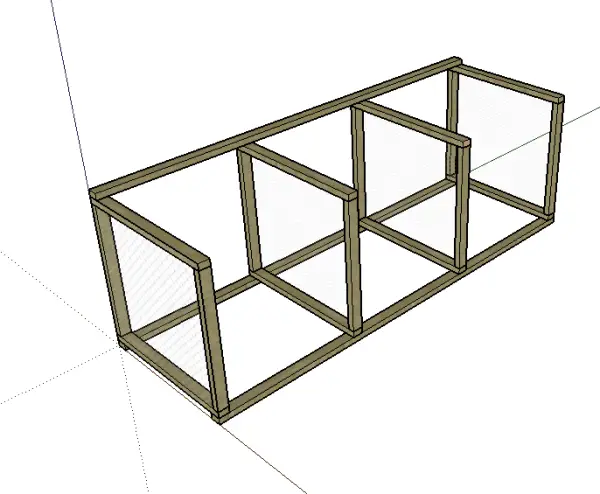
Cut a 9-foot piece from each 10-foot length of pressure-treated 2 x 4 lumber. Place the two treated boards across the tops of the dividers so that each is flush against the outer edges. Measure and mark on the 9-foot boards the center of each inside divider.
Line up the marks, and through each junction of board and divider, drill a 1/2-inch hole centered 1 inch from the edge. Secure the boards with carriage bolts, but do not tighten them yet. Turn the unit so that the treated boards are on the bottom.
Cut one 9-foot piece from the 10-foot length of construction-grade 2 x 4 lumber. Attach the board to the back of the top by repeating the process used to attach the base boards. Using the carpenter’s square, or measuring between opposing corners, make sure the bin is square. Tighten all the bolts securely.
Fasten a 9-foot length of hardware cloth to the back side of the bin, with staples every 4 inches around the frame.
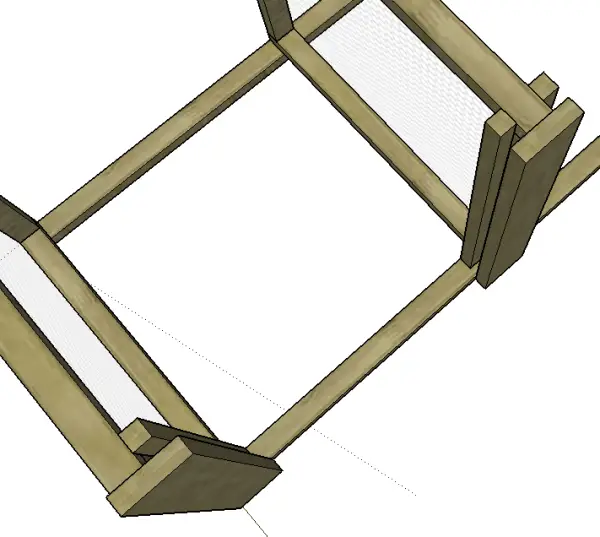
Cut four 36-inch-long pieces from the 16-foot length of 2 x 6 lumber for front runners. (Save the remaining 4-foot length.) Rip-cut two of these boards to two 4-3/4-inch-wide strips (save the two remaining strips).
Nail the 4-3/4-inch-wide strips to the front of the outside dividers and baseboard so that they are flush on the top and the outside edges. Center the two remaining 6-inch-wide boards on the front of the inside dividers flush with the top edge and nail securely.
Cut the remaining 4-foot length of 2 x 6 lumber into a 34-inch-long piece, and then rip-cut this piece into four equal strips. Trim the two strips saved from Step 8 to 34 inches. Nail each 34-inch strip to the insides of the dividers so that they are parallel to, and 1 inch away from, the boards attached to the front. This creates a 1-inch vertical slot on the inside of each divider
Cut the six 8-foot lengths of 1 x 6 lumber into 18 slats, each 31-1/4 inches long. Insert the horizontal slats, six per bin, between the dividers and into the vertical slots.
Stain all untreated wood.
Copyright 1993 to 2013 University of Missouri. Published by MU Extension, all rights reserved.
For modern houses or apartments, using heating is common, but for some homes, Fireplace is preferred as Sara warms her body while gathering with family.
The fireplace may belong to one of the important items to be installed in the interior of the house. If you also plan to make a fireplace in your living room, you must first determine the theme of your entire home. This is very beneficial because creating a certain fireplace must consider balance at all. So, following a few references is a good idea to do.
Farmhouse Fireplace Mantel Design and Decor Ideas
After you decide to manage the fireplace in your home, you have considered its function. Even though everyone might know its function, some people just light fires for decoration.
Here are the designs and decorations of the farmhouse fireplace that will amaze you
Awesome Farmhouse Fireplace DecorAwesome Farmhouse Mantel Decor IdeasBest Farmhouse Fireplace MantelBest Modern Farmhouse FireplaceBright Farmhouse Living Room Farmhouse Stone FireplaceChic Best Modern Farmhouse Fireplace MantelCool Farmhouse Fireplace MantelCool Farmhouse Fireplace MantelsDining Room With Farmhouse FireplaceDogberry Collections Modern Farmhouse Fireplace MantelElegant Farmhouse Rustic Fireplace Mantel DecorFabulous Farmhouse Mantel Decorating IdeasFarmhouse Fireplace Design IdeasFarmhouse Fireplace Mantel Decor IdeasFarmhouse fireplace mantel decorFarmhouse Fireplace Mantel DiyFarmhouse Mantel Decor IdeasFarmhouse Mantel with Magnolia WreathFarmhouse style fireplace ideasFarmhouse style fireplace mantel ideasFireplace Mantels DecorIncredible Farmhouse Fireplace MantelLuxurious Farmhouse Living Rooms With FireplaceModern Farmhouse Fireplace GlamorousModern Farmhouse Fireplace IdeasSimple Farmhouse Fireplace Mantel DecorSimple Farmhouse MantelWardell Builders Japanese Farmhouse FireplaceWhite Brick Fireplace Mantel IdeasWonderful Fireplaces Mantel Decor Ideas
The farmhouse is one of the most popular designs or decorations in the world. Even though it looks like the countryside, the farmhouse decor provides comfort and tranquility for its owner.
Custom wine cellars like this closet conversation are surprisingly affordable and do a great job of turning wasted spaces into substantial features that transform what would otherwise be average homes into something that leave an impression. Not to mention also providing endless enjoyment to the serious wine lover and their friends and family.
Proper Wine Storage Facility for Long- Term Enjoyment of Wine
When the wine has matured properly, you and your friends will enjoy every glass of it. To achieve this, it must be stored in a climate-controlled custom wine cellar. This is the main reason many residential owners have invested in a wine storage facility designed and built by an expert.
In building wine cellars, our primary goal is to provide racking and cooling solutions that will store and protect our client’s precious collection for many years to come. We make sure that every wine cellar is appealing, provides the optimum environment, and maximizes storage capacity.
Wine Cellar Specialists has extensive experience in wine cellar construction. Recently, the Dann family in Dallas, Texas, wanted to transform their small pantry into a custom wine cellar. They requested us to create a design that would suit their aesthetic, functional, and financial requirements.
We received the 2012 ARC Award for the Best Wine Cellar Remodel for this closet conversion project.
Whatever the size and shape of your room, we will help you transform it into a stunning residential wine cellar. On this project, the pantry was located under the stairs. We had to design wine racks that would fit perfectly in the odd-shaped room.
We used Mahogany for constructing the wine racks. This type of wood is widely used in construction because of its beauty and stability. We had it lacquered to achieve a richer look.
We assembled the wine racks in the garage area and screwed the back stabilizers. The total bottle capacity was 496. However, the client was able to fit 514 bottles when the cellar was completed.
Before the installation of the racking, we created 3-dimensional drawings, which showed the various elevations of the wine cellar. Each elevation was labeled A (left wall), B (back wall), C (back wall), and D (right wall). These provided the owner a better visualization of the completed wine cellar.
Since the pantry is located under the stairs, there is a slanted ceiling, located on the left side of the room. We installed a wine rack with slanted tops in the left wall to follow the descending height of the ceiling. It was intended for 750ml bottle wine storage.
We added a support rack where the back of the double-deep section comes out. Its function is to support the racks above it.
The racking is 13 ½ inches deep, has a 1 ½-inch toe-kick and base molding, and a 2 ¼-inch crown molding at the top.
We divided the back wall into two elevations. Elevation B has the shortest rack in this custom wine cellar in Dallas. The bottom section consists of a double-deep X-bin storage rack, which allows for bulk storage. Each opening stores the bottles on top of each other.
We added a tabletop and a horizontal wine rack above it. The tabletop provides space for some of the owner’s bottles, which are about to be consumed. It can also display some wine cellar accessories like decanters. The 3-deep horizontal wine rack stores the bottles with the labels facing out.
Elevation C is located on the right side of the back wall. The top and bottom sections allow for storing 750ml bottles individually. The middle section is a high reveal display row, which highlights some of Mr. Dann’s bottles.
(Right Wall) Elevation D
The wine rack in the right wall was constructed with a depth of only 6 inches because it is close to the doorway. It is a single-deep horizontal wine rack that goes all the way up to the level of the door.
We installed the cooling unit above it. To make the refrigeration unit look like it was part of the racking, we concealed it in a wooden grill cover and box made from Mahogany. The grill cover is much larger than usual because of the way we had to run the lines for this cellar.
Adding the Proper Insulation – Essential in Maintaining a Stable Wine Storage Environment
Before installing the cooling unit, your wine cellar must be well insulated. Poor insulation can result in unstable storage conditions, causing a waste of investment.
The Role of Insulation in Controlling Temperature and Humidity in Custom Wine Cellars in Dallas
Ideally, the wine storage temperature must be between 55-65 degrees Fahrenheit to preserve wine’s desirable characteristics before it is consumed. Excessive temperature fluctuations can cause premature aging, which gives the wine an unpleasant taste.
Humidity levels must be maintained within 60-70 percent. The cork will dry out, shrink, and become brittle if the humidity is too low.
When this happens, an unwanted amount of air will come in contact with the wine and spoil it. Going above the normal range can trigger mold growth on your walls and racking, damaging their structural integrity. Mildew can also form on the cork and wine cork.
On this project, we installed an insulation using green board, which is a moisture resistant material recommended by Dallas master builders for the walls and ceiling of refrigerated custom wine cellars. We also added a vapor barrier and painted the walls.
Cooling the Cellar with a Commercial Grade Wine Refrigeration Unit
We used an RM 2600 cooling unit split system on this project. We placed the evaporator inside the wine cellar, hidden in a grill cover box.
We could not run the drain line at an angle with a gravitational flow, so we had to add a condensation pump below the cooling unit. This helped pump the condensation up before it could run down. The split system and drain lines go up and across the kitchen ceiling, and into the garage.
For the entryway, we installed a Tuscan style, rectangular door. It has an arched glass with an ornate wrought iron design. We applied a custom stain to match their existing kitchen cabinets.
We also added a custom molding to match the rest of the moldings in their home. We added an automatic door bottom to prevent scratches on the flooring.
The LED spotlights, which we installed on the left wall, can be pointed to different directions in the cellar. One of the advantages of the LED lighting system is its low heat emission. Too much heat can damage wine.
Although more expensive than regular bulbs, LED lights are known to have a longer lifespan and consume less energy, saving you more money in the long run. If you want to illuminate your wine cellar dramatically while keeping your collection safe, the LED lighting system is the best option.
Considering Your Residential Wine Room Conversion Project? Work with a Specialist.
If you have an underutilized area in your Dallas home and would like to explore the possibility of turning it into a home wine cellar, simply call +1 (972) 454-0480 or complete the custom wine cellars design request and get a FREE 3D Design of your own.
In the videos below we will talk you through the design considerations of this Texas custom wine cellar project. We show you lots of detail including how the racks arrive and are assembled, before and after steps of the build process and how the wine cellar refrigeration system is installed and what it looks like once completed.
Custom Wine Cellars Texas – Part One – Dallas Dann Closet Conversion
Custom Wine Cellars Texas – Part Two – Dallas Dann Closet Conversion
Texas Residential Custom Wine Cellar Project – Full Image Gallery
We hope you enjoy seeing the full set of before and after images of the custom wine cellar project. If you have an underutilized area in your home and would like to explore the possibility of turning it into a home wine cellar simply call +1 (972) 454-0480 or complete the custom wine cellars design request and get a FREE 3D Design of your own.